Pass AIS APIs
Fabrick Pass, through the exposed APIs, allows FPPs to access the accounts of their customers, obviously after their consent. For this reason, the first step is the customer onboarding phase.
Introduction
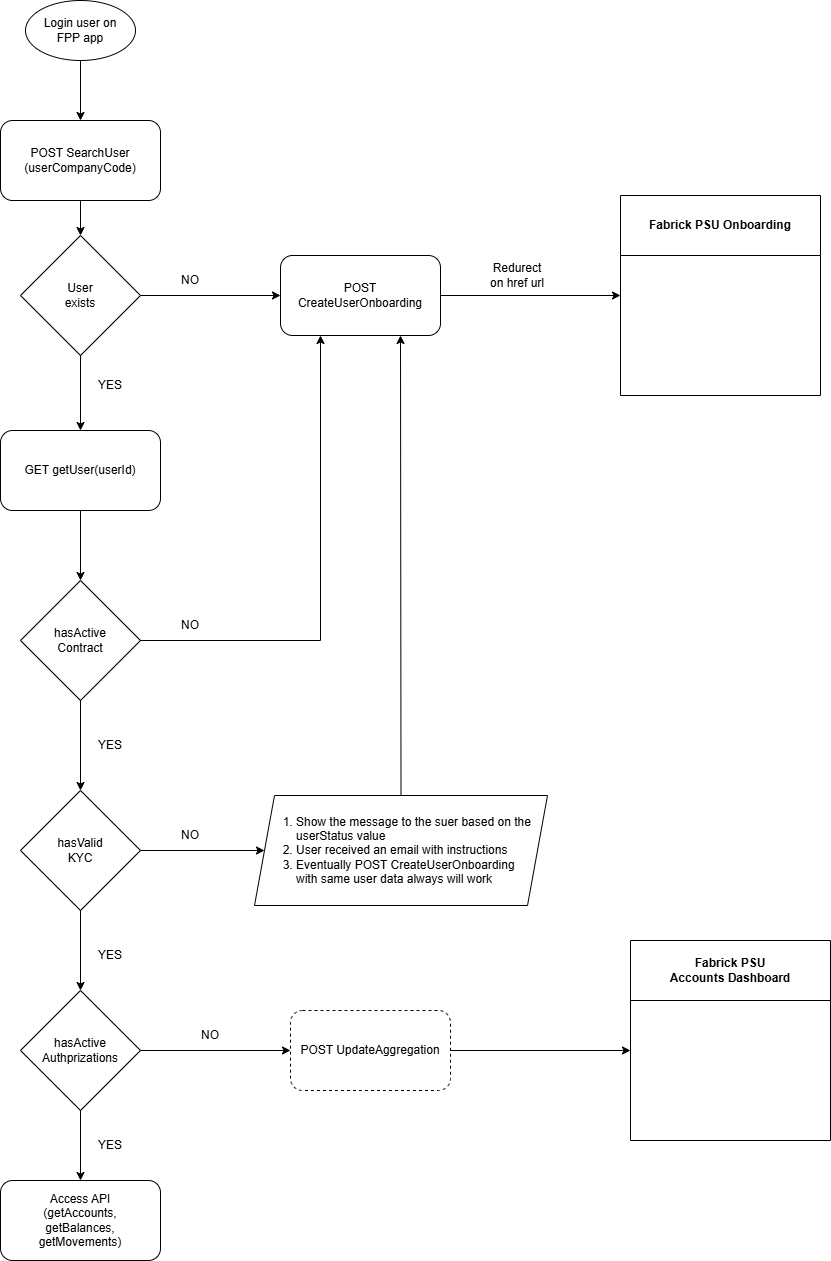
The following picture shows the high-level flow:
Suggested flow
This section shows the suggested API flow diagram. All APIs will be described in the following sections.
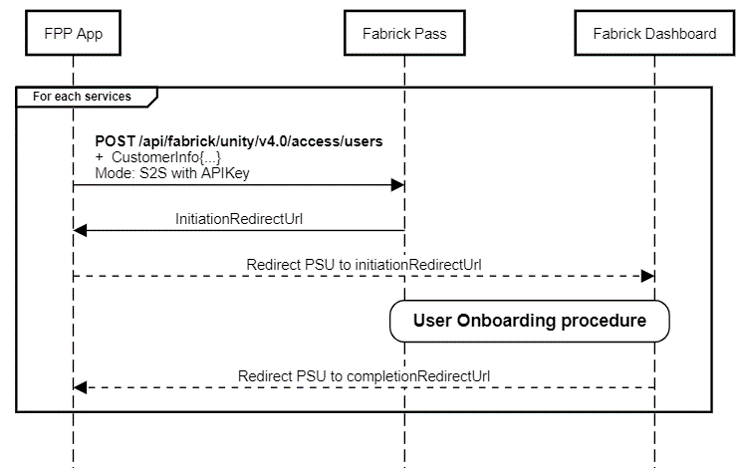
Onbarding
To start the onboarding process the FPP will have to invoke invoke the POST CreateOnBoardingUser endpoint which will allow it to initialize the user's Fabrick onboarding flow. As shown below, the request input body contains a series of information relating to the user and some parameters useful for the procedure, specifically:
-
mode: the workflow mode. For this product it will be always "REDIRECT
-
CustomerInfo
- User personal information (name, surname, etc ..);
- companyUserCode: free string with which the FPP uniquely identifies each of its customers and thanks to which it will be possible to map the user's information in Fabrick;
- companyContractCode: additional and optional free string, it is a code that identifies the contract between the user and the FPP.
- subjectType: user type, for this product the value is always NATURAL_PERSON. It is not possible to create onboarding for legal person.
-
CompletionRedirectUrls: parameter that contains the links in which the user must be redirected upon completion of the onboarding phase; in particular, the FPP will have to insert a link in case of success and one in case of error.
The required parameters of the request are: both URI of the object completionRedirectUrls, subjectType, companyUserCode, name, surname, fiscalCode, birthDate, birthPlace, homeAddress.country.
Make sure name and surname are correct and complete as they will be used for the recognition phase. They must therefore coincide with those indicated in the SPID or in the bank account or in the document depending on the method preferred by the PSU.
Finally citizenship, birthCountryCode and country they have to be evaluated according to the ISO 3166-1 alpha-2 standard.
POST /v4.0/access/users

{
    "mode": "REDIRECT",
    "completionRedirectUrls": {
        "onSuccess": "http://fpp-app.com?onb=ok",
        "onFailure": "http://fpp-app.com?onb=ko"
    },
    "customerInfo": {
        "subjectType": "NATURAL_PERSON",
        "companyUserCode": "abc123",
        "name": "Mauro",
        "surname": "ROSSI",
        "fiscalCode": "RSSMRA63R30F205H",
        "birthDate": "1963-11-30",
        "birthPlace": "Milano",
        "citizenship": "IT",
        "birthCountryCode": "IT",
        "homeAddress": {
           "address": "via Rossi",
           "buildingNumber": 187,
           "postalCode": "20100",
           "city": "Milano",
           "province": "MI",
           "country": "IT"
        },
        "currentAddress": {
          "address": "via Rossi",
          "buildingNumber": 187,
          "postalCode": "20100",
          "city": "Milano",
          "province": "MI",
          "country": "IT"
        },
        "contacts": {
          "mobile": "3331234567",
          "mail": "m.rossi@gmail.com"
        }
     }
}
In the case of a foreign place of birth, it will be necessary to set the birthPlace parameter with the country name in Italian according to the standard ISO_3166-1 (e.g. Stati Uniti, Cina, Egitto,....)
mobile parameter is useful only in pre-production environment. The value +393334445555 allow to skyp the fiscal code check.
The output will be like this:
{
    "status": "OK",
    "payload": {
        "mode": "REDIRECT",
        "completionRedirectUrls": {
            "onSuccess": "http://fpp-app.com?onb=ok",
            "onFailure": "http://fpp-app.com?onb=ko"
        },
        "customerInfo": {
            "subjectType": "NATURAL_PERSON",
            "companyUserCode": "",
            "name": "Mauro",
            "surname": "ROSSI",
            "fiscalCode": "RSSMRA63R30F205H",
            "birthDate": "1963-11-30",
            "birthPlace": "Milano",
            "citizenship": "IT",
            "homeAddress": {
                "address": "via Rossi",
                "buildingNumber": 187
                "postalCode": "20100",
                "city": "Milano",
                "province": "MI",
                "country": "IT"
            },
            "currentAddress": {
                "address": "via Rossi",
                "buildingNumber": 187
                "postalCode": "20100",
                "city": "Milano",
                "province": "MI",
                "country": "IT"
            },
            "contacts": {
                "mobile": "3331234567",
                "mail": "m.rossi@gmail.com"
            }
        },
        "userOnboardingId": "f118f1f1-...dfb3282",
        "initiationRedirectUrl": "https://fabrick.com/pass/..."
    }
}
In output the FPP will obtain two fundamental information:
- initiationRedirectUrl: URL to which the user has to be redirected to start the onboarding procedure. The link lasts 3 days.
- userOnboardingId: code that identifies the onboarding of a given user.
It is not necessary, and it is not recommended, to save the initiationRedirectUrl link as Fabrick stores the steps performed by the user. When the same user tries a new onboarding he will resume from the point where he had stopped and / or left the previous time.
The Fabrick onboarding procedure includes all the phases that will allow the user to be able to aggregate their banking products. The onboarding will allow to register the FPP customer within the Fabrick systems, in detail the steps that will be performed are the following:
- Credential creation Fabrick Pass and email verification;
- Confirmation of personal data;
- User recognition through one of the services made available, that is, Strong Customer Authentication, SPID or Documental;
- Compilation of the AML questionnaire (anti-money laundering);
- Contract signed with Fabrick.
Once the steps described above have been completed, the user will have given consent to the FPP to access one or more of their accounts.
In technical terms, this step will create a Contract between the newly registered user and the Service in question exposed by the FPP and, secondly, an Authorization on one or more specific accounts.
Let's move on to an example to clarify the concepts just mentioned. Let's suppose that Digitopolis Spa, a leading company in the digital sector, intends to launch two new projects for its customers: MyAccounts and TaacDiscount. Both projects involve the development of both web and mobile applications. The first application will allow a customer to aggregate and view their accounts even se they are from different banks, in this way the user can have an overview of all their accounts. TaacDiscount, on the other hand, is designed for its front office employees and sales managers: the latter, following the customer's consent to access one of their accounts, will be able to offer a discount and a method of financing the product just purchased. The same application will then also be included on the e-commerce site so that the user can proceed independently. To carry out these projects, Digitopolis contacts Fabrick to exploit the potential of Fabrick Pass.
In a case like this Digitopolis Spa represents the Company that Fabrick will add in the registry to which a companyId will be associated:
Company: Digitopolis Spa CompanyId: 1
Furthermore Digitopolis Spa intends to develop two different apps and each customer can freely decide whether to use or join one, the other or both; for this reason each of the two projects will correspond to a Fabrick Pass Service. Each service will be referenced by its own serviceId and an apiKey will be associated with it. So the first service will be configured as follows:
Service: MyAccounts serviceId: 1 apiKey: 123abc456def123abc456def apiKeyId: 1234
while the second service:
Service: TaacDiscount serviceId: 2 apiKey: fed654cba321fed654cba321 apiKeyId: 4321
In this way, each service will be totally independent from the other, so let's continue our example taking TaacDiscount into consideration.
The customer Carlo Rossi buys everything he needs for smart working from the Digitopolis online site. At the time of payment, TaacDiscount comes into play and offers a discount and a personalized financing method; to accept the individual, Carlo must give his consent to Digitopolis Spa to view the information relating to one of his bank accounts. At this point, the customer will proceed to fill in the form shown by the UI by entering all their personal data and once completed, they will be redirected to the Fabrick Dashboard, the page that will allow them to complete the authentication and SCA (Strong Customer Authentication) phase. In this phase the user will create a Contract, i.e. a contract between the customer and the service on which he is registering:
companyId: 1 serviceId: 2 companyUserCode: carlo.rossi@email.it userId: "1001"
Each contract is uniquely identified by a contractId, in our example
contractId: 50
Proceeding to the onboarding phase, Mr. Carlo will be asked to choose which account (in the case of accounts on different banks or multiple accounts on the same bank) to authorize access by Digitopolis Spa: this selection is defined as Authorization, in fact, an authorization will be created between the previously created contract and the account in question identified with an accountId.
contractId: 55 accountId: 372
Each authorization is also uniquely identified thanks to an authorizationId:
authorizationId: 678
Once the onboarding phase has been completed, the user will be redirected to the Digitopolis Spa website and can proceed with the purchase by taking advantage of the discount and financing offered by the company.
Onboarding steps details
PSU recognition
The onboarding phase allows you to register a user (PSU) on the Fabrick platform, se the PSU is already present it will be redirected to the login page: as regards Italy, the control takes place via fiscal code.
For all the other countries, however, the control takes place directly on the personal data of the PSU. In the future both cases will be handled in the same way thanks to a unique identification code.
Test Facilitations
In the pre-production environment, to facilitate testing, a workaround has been created to bypass tax code validation. By entering the phone number "+393334445555", it will be possible to enter any tax code without enforcing a match with the personal data of the PSU. The length of the tax code must still be adhered to. Of course, it is always possible to enter real data as well.
SuperUser and TechUser
SuperUsers and TechUsers for obvious reasons will already be registered on Fabrick, for this reason the first time they try the onboarding phase they will be redirected to the login page. To log in, simply enter the same credentials that you use to log in to the console https://www.platfr.io/#/platfr/login.
For the same reason it is not possible to use the SuperUsers and TechUsers data to test the onboarding or the login steps in pre-production.
PSU registered in production environment
Once a PSU finishes successfully the onboarding phase in production environment, it will no longer be able to complete a new onboarding or to access in pre-production environment dashboard. For tests it is always possible to use mock data as indicated above.
PSU data update
Once the onboarding has been completed, it is no longer possible to modify the personal data of the PSU, in detail all the information useful for calculating the fiscal code. On the other hand, the PSU may at any time update all other information, such as residence, address, email address to receive communications, directly from the Fabrick dashboard. Updated data is not transmitted to the FPP, so in a case like this there could be a mismatch between Fabrick and FPP.
Onboarding suspended
The onboading phase can be interrupted at any time, the next time the PSU will recover exactly from the point where it left off. The flow will always start from scratch instead until the email address is confirmed.
companyUserCode vs email address
As previously indicated, the POST CreateOnBoardingUser service accepts as input email address and companyUserCode. The latter is used exclusively to create a mapping between Fabrick and the FPP for the PSU: it could therefore be, for example, the mechanographic code of the FPP customer or simply it could coincide with the email address.
On the other hand, the email address has a dual purpose:
- username to access the Fabrick dashboard
- contact for communications from Fabrick to the PSU
Although the two entities are initially valued with the email address, it could happen that they subsequently differ. The PSU has in fact the possibility to update and change its email address to receive communications from its dashboard, but it will not be able (to date) to change its username to access the dashboard. For needs contact Fabrick directly.
In the case of password recovery (the functionality displayed on the UI), Fabrick sends an email to the email address corresponding to the username and not the contact one.
It should also be noted that the email address taken into consideration by Fabrick is not necessarily the one passed through the API, but the one confirmed by the PSU on the first page of onBoarding which can be changed immediately from the PSU.
Finally, we point out that companyUserCode and email address will always be distinct, even se they are valued in the same way.
Sample:
FPP sends via the service POST CreateOnBoardingUser:
- companyUserCode = paolo@mail.com
- mail = companyUserCode = paolo@mail.com
PSU is redirected to the Fabrick page, where as the first step he must confirm the email and, we suppose, he changes the address to paolo2@mail.com, we will have so:
- companyUserCode= paolo@mail.com
- mail = paolo2@mail.com
After completing onboarding the PSU authenticates itself on the dashboard and changes its email address to paolo3@mail.com, now the situation will be:
- companyUserCode= paolo@mail.com
- email (intended as a login username) = paolo2@mail.com
- email (intended as a contact for any communications) paolo3@mail.com
Errors sample
| Error | Description | Solution |
|---|---|---|
| Fiscal code is not valid | The fiscal code is incorrect or is not consistent with the personal data entered | Check the correctness of the tax code using for example the online tax code generator |
| Cannot validate fiscal code [x] with user [y] | The customer is already registered, but the fiscal code and mail entered do not correspond to those in the Fabrick registry | Contact Fabrick with details (correlationId or workflowId). An example would be adding a SuperUser or TechUser independently from the portal. In this case the user will be added to Fabrick but without any fiscal code |
Get the customers list
To get the customers list, simply invoke the POST Search Users API.
Get user details
The endpoint GET getUserDetails allows you to search for information about a single user.
In the endpoint path you must specify the userId which is the code that uniquely identifies a user within Fabrick
GET api/fabrick/pass/v4.0/access/users/{{userId}}
For example
GET api/fabrick/pass/v4.0/access/users/1234

{
    "status": "OK",
    "payload": {
        "userCompanyCode": "m.rossi99@fabrick.com",
        "userId": "1234",
        "companyId": "22",
        "hasActiveContract": true,
        "hasActiveAuthorizations": true,
        "hasValidKyc": true
    }
}
In the user's details it is possible also to check se the user has a valid KYC ( hasValidKyc). In the Fabrick Pass (standard version) product it is a constraint, se the user's KYC is not valid then the FPP cannot get the user accounts data.
Only se hasValidKyc = false, the userStatus parameter is present in the body of the response. This parameter provides more information about the invalid KYC and has the following values:
- DATA_CHECK: checks are in progress on the Fabrick side, the user will receive appropriate communications to continue once the checks on the Fabrick side have been completed
- USER_ACTION: the user has received instructions to complete the onboarding process after a KO (e.g. he must reload documents or photos)
- REJECTED: the user is not eligible to use the service
In case of USER_ACTION the customer will receive an email from Fabrick. Inside the email there will be a link to the Fabrick pages to allow the customer to regularize his position. The link has a duration of 168 hours (7 days).
Moreover it could be present the additional paramter detailsKycMessage an array containing extra information regarding the KYC and/or AML status of the customer.
In all cases it will always be possible to redirect the customer to the FPP onboarding page, Fabrick will recognize the customer and bring him back to the step to be completed.
In the event that the aforementioned link, sent by Fabrick via email, has expired, then the new onboarding would be the only solution to allow the user to complete the process successfully.
It is therefore important to take this aspect into consideration during the development of the application UX.
Modify the companyUserCode
It is always possible to modify the companyUserCode parameter via the following API:
PUT /v4.0/access/users/{{userId}
{
  "userCompanyCode": "test@gmail.com"
}
The response will return the updated field as shown in the following example:
{
  "status": "OK",
  "payload": {
    "userCompanyCode": newTest@gmail.com,
    "userId": "1234"
  }
}
Disable an User
The FPP has the possibility to disable an user simply invoking the PUT DisableUser API:
PUT /v4.0/access/users/{{userId}/inactive
The user will be disabled only for the indicated service (therefore according to the apiKey used), this means that the user will be active both for any other services of the FPP and for any other FPPs to which it is associated.
It is always possible to enable it at any time thanks to the onboarding steps which will obviously be simplified as many of the steps are already saved. The userId will of course remain the same.
The user can autonomously do the same operation from his Fabrick dashboard.
A disabled user will no longer be able to view information about accounts from the Fabrick dashboard
Get onboarding status
At any time the FPP will be able to know the status of a particular onboarding flow simply by invoking the GET getOnBoardingUser and evaluating the status parameter.
GET /v4.0/access/users/onboardings/{{userOnboardingid}}
In the response the status paramete refers only to navigation, that is, it is related only to the graphic part and to the user experience (V. Workflow Details)
For this reason FPPs can avoid to integrate this API and to invoke only GET getUserDetails service.
Consent and Authorization management
This section describes the UpdateAggregation workflow that allows FPP customers to renew their consent and, in the event of a new aggregation, to grant authorizations directly to the FPP in question.
The workflow can be initialized by the FPP through the POST UpdateAggregation API as shown in the following example:
POST /v4.0/access/update-aggregation

{
    "mode": "REDIRECT",
    "completionRedirectUrls": {
        "onSuccess": "http://google.it",
        "onFailure": "http://yahoo.it"
    },
    "userId":"123123"
}
As known, the userId will be retrieved through the POST SearchUsers service.
The response is like the following:
{
    "status": "OK",
    "payload": {
        "initiationRedirectUrl": "https://fabrick.com/../pass/v4.0/update-aggregation/d2a4...8?jwtToken=eyJr...0HU",
        "status": "WORK_IN_PROGRESS",
        "workflowId": "d2a4afde-1234-5678-9876-796ecad2b8b8",
        "createdDatetime": "2023-12-13T09:29:59.030+0000"
    }
}
The duration of initiationRedirectUrl is 72 hours.
The workflow consists of the following steps:
- PSU Login
- UI shows an overview of the accounts and banks of the PSU (REN0 step)
- account aggregation or consent renewal flows (ProductAggregation step)
- passage in which the PSU will manage the authorizations of the newly aggregated accounts (REN1 step)
After logging in, the PSU will be able to view and manage all its accounts:
- delete one or more accounts;
- revoke a consent to Fabrick and consequently also to FPP
- renew a consent (regardless of whether it has expired or not);
- aggregate one or more new accounts.
Get the consents list
It is possible to check the expiration date of all consents per user through the POST SearchConsents service. This service returns the list of consents having an expiration date between the current date and the current date + expiringInDays regardless of their status. Consents expired before the day of the request will therefore not be displayed.
POST /v4.0/access/consents/search HTTP/1.1

{
  "expiringInDays": 10
}
In this example I will get all the consents that are going to expire in the next 10 days.
Below is an example of an answer:
{
    "status": "OK",
    "payload": {
        "list": [
            {
                "consentId": "48ec3dc6-1234-5678-9101-68ee6e253253",
                "userId": "1",
                "createdDatetime": "2022-10-24T15:52:33.436+0200",
                "startDatetime": "2022-10-24T15:52:33.436+0200",
                "endDatetime": "2023-01-21T00:00:00.000+0100",
                "status": "EXPIRED"
            },
            ...
            {
                "consentId": "008ab1ce-9876-5432-1234-11eefaf8776b",
                "userId": "2",
                "createdDatetime": "2022-10-24T16:35:59.440+0200",
                "startDatetime": "2022-10-24T16:35:59.440+0200",
                "endDatetime": "2023-01-21T23:59:59.000+0100",
                "status": "EXPIRED"
            }
        ]
    }
}
where:
- consentId: indicates the unique id relating to the consent
- userId: indicates the userId
- createdDatetime: indicates the creation date of the consent
- startDatetime: indicates the starting date of the consent (it will always coincide with the createdDatetime)
- endDatetime: indicates the expiry date of the consent
- status: indicates the consent statis (see Consent details doc)
Consents scheduler
On a daily basis, at 4:00 am, the expiration dates of all consents are checked and se the latter corresponds to the current date, the status of the consent to EXPIRED will be updated.