Google Pay
Why choose Google Pay
Google Pay is the digital payment system developed by Google that allows customers to pay simply, quickly and securely via smartphone (NFC) or on the web, using the card details saved in their Google account.
Integrating it into your e-commerce expands the available payment methods and improves the user experience thanks to a fast, frictionless checkout. It removes the need to manually enter card details and, thanks to the authentication already present on the device or on the Google account, customers authorize payments instantly with a simple tap.
For further information, see the official Google Pay API documentation
Services and features available through the Fabrick integration
Integrating Google Pay with Fabrick Payment Orchestra provides a complete ecosystem of features to simplify transaction management and improve the experience for both the merchant and the customer.
- Compatible with apps and websites: support for both Android apps and web integrations via the Google Pay JS API.
- Payment Token management: Fabrick autonomously handles the payment token by presenting Google Pay on its own page, with no additional development required on the merchant side.
- Fabrick Guaranteed Payments: fraud prevention service supporting the merchant (learn more).
- Fabrick Advice: Transaction Risk Analysis (TRA) service to take advantage of the exemptions provided by PSD2 (learn more).
- Simplified reconciliation: payment management through dedicated reports (learn more).
- Advanced transaction management: support for partial or multiple captures and refunds for flexible payment handling.
- Multi-currency support: compatibility with multiple currencies for international transactions.
- International card scheme support: Google Pay via Fabrick supports Visa, Mastercard.
Google Pay on Fabrick Payment Orchestra: activation and integration options
Activation request
You can request Google Pay activation with Fabrick by:
- Contacting your sales representative
- Contacting support at the following link
Once you receive confirmation, you can verify the activation from the dashboard:
- Log in to the Fabrick Dashboard
- From the side menu, select Workspace → Stores → [Select store] → Configurations
- In the list of payment methods, locate Google Pay and check that its status is Active
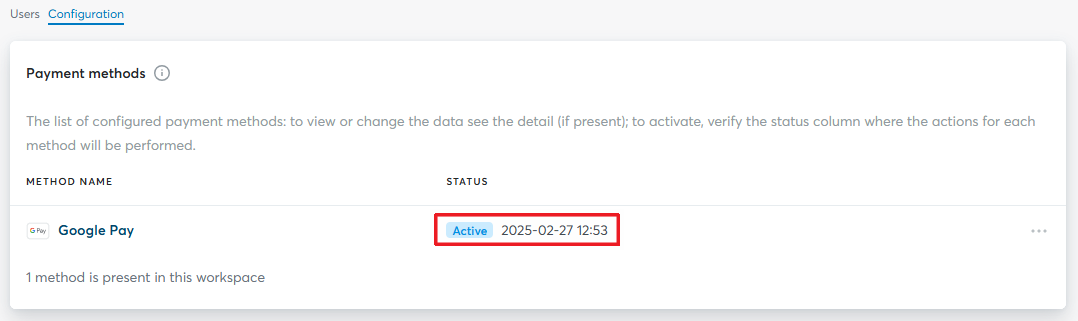
From this moment on, your e-commerce is ready to accept Google Pay payments through Fabrick Payment Orchestra.
Integration types
Fabrick offers two integration options for Google Pay:
-
Hosted integration
Supported integrations
✓HPPO✓Pay By Link✓Web Component✓LightboxGoogle Pay is displayed directly on the payment page. Fabrick autonomously manages the button display, the token generation and the entire payment request processing phase. For integrations via Web Component or using a WebView, an additional configuration step is required.
-
API integration
Supported integrations
✓API OnlyIn this mode, Google Pay is integrated directly into the merchant's website or app. The merchant is responsible for implementing the payment button, generating the token and sending it to Fabrick for transaction processing.
Google Pay is supported by the main modern browsers, including Chrome, Edge, Firefox and Safari.
To run tests you need a Google account and an Android device or a browser that supports Google Wallet.
To learn more:
Hosted integration
Google Pay is displayed directly on the payment page. Fabrick autonomously manages the button, the payment token generation and the authentication flow (SCA) when required.
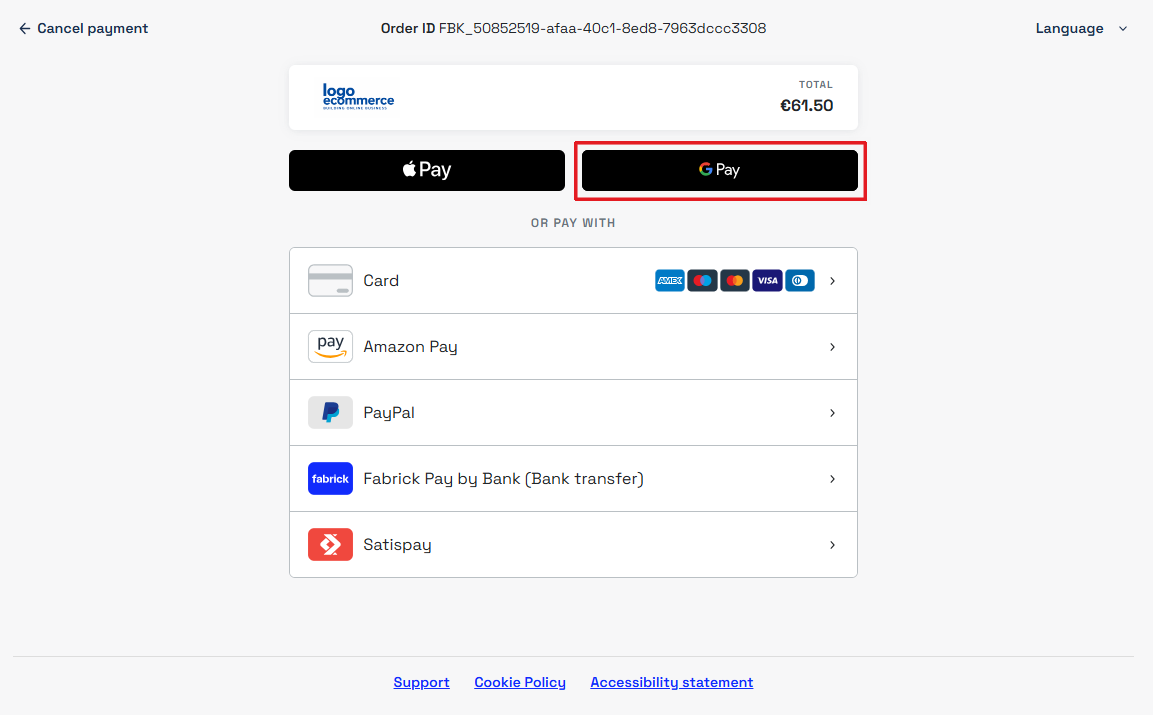
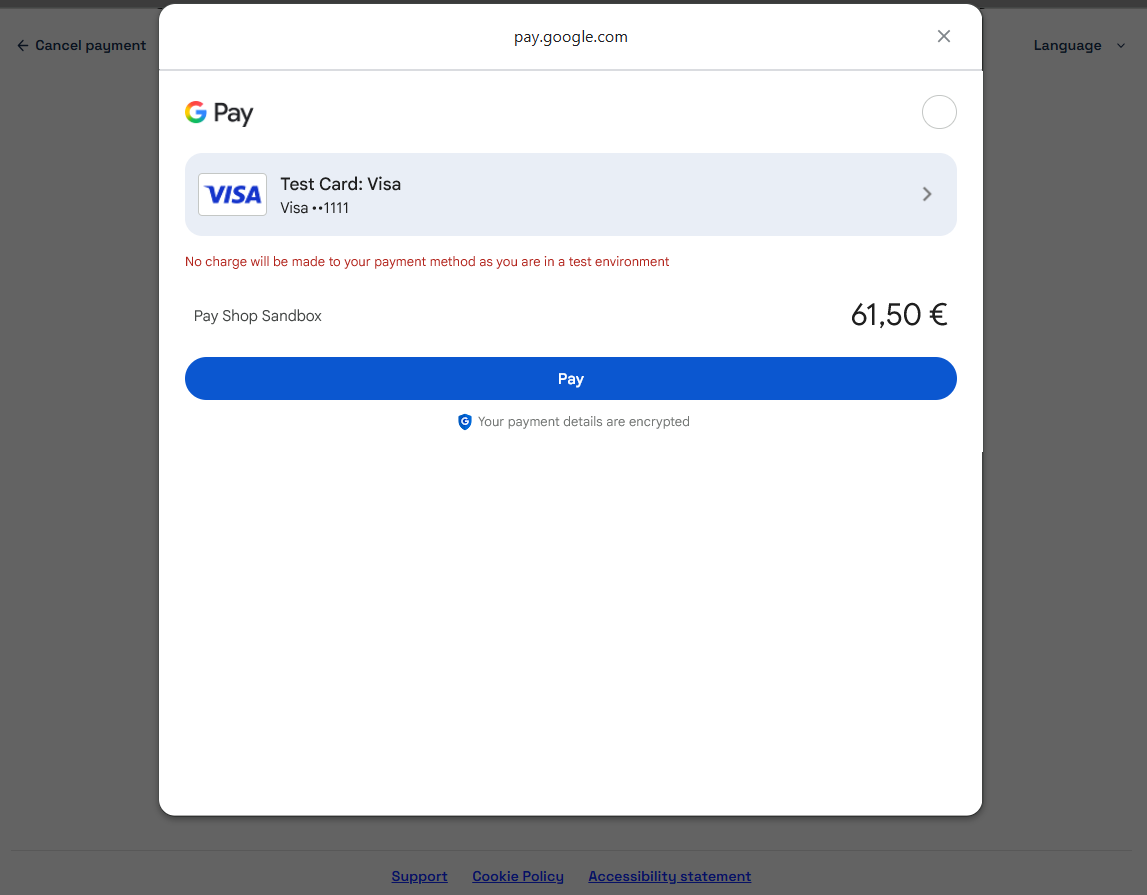
When the user selects Google Pay, the Google modal opens in the browser to choose the card with which to complete the payment.
Additional configuration for Web Component and WebView
For these integrations, Google Pay runs directly on the merchant's domain. It is therefore required to register your domain through the Google Pay & Wallet Console and wait for Google's approval. The procedure is described in the official guide.
After receiving Google's approval, for integrations via Web Component, communicate your Merchant ID to your sales representative or to support to associate it with your Fabrick account and complete the configuration.
If your web checkout is embedded in an Android WebView, additional app-side configurations are required; for this integration you do not need to communicate your Merchant ID to Fabrick. See the official Google guide.
API integration
Activation requirements
To use the API integration with Google Pay via Fabrick you need:
-
Google Pay & Wallet Console: You need to register an account on the Google Pay & Wallet Console to manage the integration, accept the policies and obtain the
merchantIdto be used in production. -
Acceptance of Google policies: All merchants must accept the Google Pay API Terms of Service and the Google Pay APIs Acceptable Use Policy before proceeding with the integration.
-
Domain registration and production access: Before going to production, you need to register your domain through the Google Pay & Wallet Console and wait for Google's approval. The procedure is described in the official guide.
Activation completedAfter receiving Google's approval, communicate your Merchant ID to your sales representative or to support to associate it with your Fabrick account and complete the configuration.
Configuring the JavaScript code on your website
The direct web integration follows the official Google Pay guide, with some Fabrick-specific settings described in the following steps.
Step 1 — Configuring tokenizationSpecification
Set gateway to gestpay to instruct Google Pay to use Fabrick as the payment gateway.
In the gatewayMerchantId parameter, specify the Fabrick shopLogin for the environment in use (sandbox or production):
"tokenizationSpecification": {
  "type": "PAYMENT_GATEWAY",
  "parameters": {
    "gateway": "gestpay",
    "gatewayMerchantId": "GESPAY12345"
  }
}
Step 2 — Supported card networks and payment methods
Configure the card networks and authentication methods supported by Fabrick through the allowedCardNetworks parameter, which defines the accepted card schemes, and allowedCardAuthMethods, which defines the authentication mode. Fabrick supports both modes:
PAN_ONLY— the card is stored in the user's Google Account, not on the device. Google returns the PAN with the expiration month and year. The transaction does not natively satisfy SCA: Fabrick will automatically run the 3DS flow as a fallback.CRYPTOGRAM_3DS— the card is tokenized on the Android device via Google Wallet. Google returns a 3DS cryptogram generated directly on the device, which natively satisfies SCA requirements: there is no need to handle the 3DS flow.
CRYPTOGRAM_3DS tokens (DPAN) are generated exclusively on Android devices. On desktop and on iOS devices, Google Pay always returns PAN_ONLY tokens (official Google FAQ).
const allowedCardNetworks = ["MASTERCARD", "VISA"];
const allowedCardAuthMethods = ["PAN_ONLY", "CRYPTOGRAM_3DS"];
For further details on the configuration parameters, see the official Google documentation.
The two methods require different cards in the test environment:
PAN_ONLY— use a card associated with your Google account for online payments. These are the cards shown in the Google Pay checkout window from a browser. You can add one directly from Chrome: Settings → Autofill and passwords → Payment methods → Add card.CRYPTOGRAM_3DS— use a card tokenized on an Android device via Google Wallet. These are not shown in the web checkout: to test them, you need to make the payment from a smartphone.
Note: the cards listed on payments.google.com are distinct from those enabled for web checkout and are not shown in the Google Pay payment window from a browser.
Step 3 — Setting the Google Pay environment
The environment parameter determines which environment Google Pay operates in. Set TEST or PRODUCTION depending on the environment in use:
const paymentsClient =
    new google.payments.api.PaymentsClient({ environment: 'TEST' });
// For the production environment use: { environment: 'PRODUCTION' }
In the TEST environment, gatewayMerchantId must be set to the Fabrick sandbox shopLogin, not the production one. The value goes in Step 1.
Note: switch to the PRODUCTION environment only after completing all tests and receiving the approvals from Google.
Step 4 — Adding the Google Pay button
Add the Google Pay button to the checkout page in compliance with the Google brand guidelines and the available customization options:
function addGooglePayButton() {
  const paymentsClient = getGooglePaymentsClient();
  const button = paymentsClient.createButton({
    onClick: onGooglePaymentButtonClicked,
    allowedPaymentMethods: [baseCardPaymentMethod]
  });
  document.getElementById('container').appendChild(button);
}
Step 5 — Defining the required payment data
Compose the paymentDataRequest object with amount, currency and merchantInfo:
const paymentDataRequest = Object.assign({}, baseRequest);
paymentDataRequest.allowedPaymentMethods = [cardPaymentMethod];
paymentDataRequest.transactionInfo = {
  totalPriceStatus: 'FINAL',
  totalPrice: '100.00',
  currencyCode: 'EUR',
  countryCode: 'IT'
};
paymentDataRequest.merchantInfo = {
  merchantId: 'MERCHANT_ID_GOOGLE',
  merchantName: 'Your store name'
};
merchantId identifies your account on the Google Pay & Wallet Console and is mandatory in production. In the TEST environment it can be omitted or set to a placeholder. To obtain it, you need to complete the registration on the Google console, as described in the official guide.
Step 6 — Handling the click and retrieving the payment token
On button click, start the request and retrieve the token to be sent to Fabrick:
function onGooglePaymentButtonClicked() {
  const paymentDataRequest = getGooglePaymentDataRequest();
  const paymentsClient = getGooglePaymentsClient();
  paymentsClient.loadPaymentData(paymentDataRequest)
    .then(function(paymentData) {
      // Send the payment token to Fabrick via payment/submit
      processPayment(paymentData.paymentMethodData.tokenizationData.token);
    })
    .catch(function(err) {
      console.error(err);
    });
}
Step 7 — Sending the payment request to Fabrick
Once the token has been obtained from the paymentData object, the payment is handled in two consecutive steps: payment/create to initialize the transaction and payment/submit to send the Google Pay token.
Step 1 — Creating the payment request
Request
POST /api/v1/payment/create
Host (sandbox): sandbox.gestpay.net
Host (production): ecomms2s.sella.it
Authorization: apikey ****************
Content-Type: application/json
{
  "shopLogin": "GESPAY12345",
  "amount": "100",
  "currency": "EUR",
  "shopTransactionID": "FBK_OrderID"
}
The amount and currency values passed to payment/create must exactly match those defined in Step 5.
In sandbox, the 3DS flow for PAN_ONLY tokens might not be triggered automatically. To simulate the production behavior, add exemption: SKIP to the payment/create call:
{
  "shopLogin": "GESPAY12345",
  "amount": "100",
  "currency": "EUR",
  "shopTransactionID": "FBK_OrderID",
  "transDetails": {
    "threeDsContainer": {
      "exemption": "SKIP"
    }
  }
}
Response
{
  "error": {
    "code": "0",
    "description": "request correctly processed"
  },
  "payload": {
    "paymentToken": "f0419188-8a78-4918-913c-a491e4e78084",
    "paymentID": "1881129911957",
    "userRedirect": null,
    "qrCode": null
  }
}
Step 2 — Sending the token and processing
Send a request to payment/submit with the Google Pay token obtained in Step 6:
PaymentTokenheader: set it to thepaymentTokenreceived in Step 1- Body: place the Google Pay token in
paymentTypeDetails.googlePay.tokenizationData.token
Request
POST /api/v1/payment/submit
Host (sandbox): sandbox.gestpay.net
Host (production): ecomms2s.sella.it
PaymentToken: f0419188-8a78-4918-913c-a491e4e78084
Content-Type: application/json
{
    "shopLogin": "GESPAY12345",
    "paymentType": "GOOGLEPAY",
    "paymentTypeDetails": {
        "googlePay": {
            "tokenizationData": {
                "token": {
                    "signature": "MEYC...",
                    "protocolVersion": "ECv1",
                    "signedMessage": "{\"encryptedMessage\":\"EFVBR...\",\"ephemeralPublicKey\":\"BPiL...\",\"tag\":\"ZN43...\"}"
                }
            }
        }
    }
}
The response varies depending on the type of Google Pay token received:
PAN_ONLY— SCA is not natively satisfied. Fabrick returns code8006withuserRedirect.hrefset to the URL of the 3DS authentication page. The merchant must redirect the buyer to that URL to complete the verification. Once done, the buyer is sent back to the outcome page and the transaction is finalized.CRYPTOGRAM_3DS— SCA is already satisfied by the cryptogram generated on the device, so there is no need to handle the 3DS flow. If the transaction is approved, the response returnstransactionResult: "OK"and the payment is completed. At the same time, the system sends a server-to-server (S2S) notification with the transaction outcome.
The protocolVersion field (ECv1 / ECv2) indicates the encryption protocol version of the token, not the authentication method: an ECv2 token can carry both PAN_ONLY and CRYPTOGRAM_3DS. The actual method (authMethod) is contained in the encrypted signedMessage, readable only by the gateway.
To distinguish, on the merchant side, the transactions that require the 3DS step-up, set assuranceDetailsRequired: true in the CardParameters (Step 2): the Google Pay response will include the assuranceDetails object with the accountVerified and cardHolderAuthenticated fields. Only if both are true is the transaction SCA-compliant and does not require 3DS; otherwise Fabrick will trigger the 3DS flow (code 8006 with userRedirect.href). For more details, see the official Google SCA guide.
Esempio di risposta per token che NON soddisfano i requisiti SCA:
Response
{
    "error": {
        "code": "0",
        "description": "request correctly processed"
    },
    "payload": {
        "transactionType": "submit",
        "transactionResult": "",
        "transactionErrorCode": "8006",
        "transactionErrorDescription": "Verify By Visa",
        "bankTransactionID": "",
        "shopTransactionID": "",
        "shopTransactionID_2": "",
        "authorizationCode": "",
        "paymentID": "1881129911957",
        "currency": "",
        "country": "",
        "company": null,
        "tdLevel": "",
        "buyer": {
            "name": "",
            "email": ""
        },
        "risk": {
            "riskResponseCode": "",
            "riskResponseDescription": ""
        },
        "customInfo": {},
        "alertCode": "",
        "alertDescription": "",
        "cvvPresent": "N",
        "maskedPAN": "",
        "paymentMethod": "",
        "productType": "",
        "token": "",
        "tokenExpiryMonth": "",
        "tokenExpiryYear": "",
        "userRedirect": {
            "href": "https://sandbox.gestpay.net/pagam/pagam3d.aspx?a=GESPAY12345&b=f0419188-8a78-4918-913c-a491e4e78084&axerve3D=True&IsLightBox=False"
        }
    }
}
Additional payment method features
You can enable additional features on the transaction by modifying the payment/create call to include specific services, such as Fabrick Guaranteed Payment or Fabrick Advice. The configured services will be automatically applied to the transaction when the customer selects Google Pay.
Support
Fabrick
- Status page: https://status.fabrick.com/
- Support: https://landing.fabrick.com/fabrick-dashboard-support