Web Components
Web Components embed the payment directly in your checkout page, with no iFrame or popup. Each component is a native HTML element you configure through attributes: you pass it the payment-id and payment-token generated by your server, and it runs the entire flow, including any redirects required by 3DS authentication or by APMs such as PayPal and Klarna.
Before you begin
Make sure you have:
- an active shopLogin issued by Fabrick;
- a backend that can call
POST /payment/createto obtainpaymentIDandpaymentToken; - a certified domain, if you want to show Apple Pay or Google Pay (see Domain certification).
Load the script
Include the script in the <head> of your page, using the URL for the environment you are working in.
- Sandbox
- Production
<script src="https://sandbox-web.axerve.com/orchestra/checkout/assets/elements/fbk-elements.js"></script>
<script src="https://web.axerve.com/orchestra/checkout/assets/elements/fbk-elements.js"></script>
Create the payment session
From your server, call POST /payment/create. The response contains the two values you will pass to the component.
| Field | Type | Description |
|---|---|---|
paymentID | string | Permanent transaction identifier |
paymentToken | string | Temporary session token |
Always generate paymentID and paymentToken server-side. Never expose them in client code.
Configure and mount the component
Set your shopLogin in one of two ways.
Via JavaScript, before the component is mounted in the DOM:
window['fbk-elements'].shop = 'YOUR_SHOP_LOGIN';
Or through the shop-login attribute, directly on the tag:
<fbk-checkout shop-login="YOUR_SHOP_LOGIN"></fbk-checkout>
Add the component to the page and pass it the mandatory payment-id and payment-token attributes:
<fbk-checkout
  id="paymentComponent"
  payment-id="PAYMENT_ID"
  payment-token="PAYMENT_TOKEN">
</fbk-checkout>
Alternatively, set the attributes via JavaScript after obtaining the tokens:
const el = document.getElementById('paymentComponent');
el.setAttribute('payment-id', paymentID);
el.setAttribute('payment-token', paymentToken);
By default the component takes up 100% of its container's width. You can size it by wrapping it in a sized <div>, with a style attribute, or through a CSS rule.
Retrieve the outcome
The component runs the entire flow, including 3DS and APM redirects. You do not register any callback.
When the payment completes, Fabrick sends a server-to-server notification and redirects the user to your result page. From either of these events, call GET /payment/detail with paymentID and paymentToken to read the full transaction details.
Non-blocking errors
During the flow the component may emit the fbk-elements-error event. It reports errors that do not interrupt the transaction but that you may want to surface to the user.
The event detail is structured as follows:
{
  "code": "",
  "title": "",
  "message": ""
}
| Field | Type | Description |
|---|---|---|
code | string | Error code |
title | string | Short error title |
message | string | Detailed error description |
Register a listener to intercept and handle it in your page:
window.addEventListener('fbk-elements-error', event => {
  const { code, title, message } = event.detail;
  // Handle the error, e.g. display a message to the user
});
Components
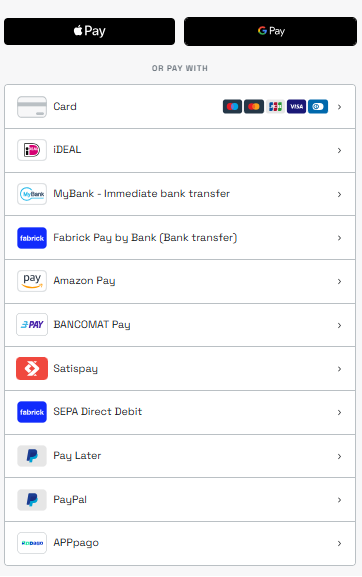
For most integrations use <fbk-checkout>: it includes every payment method and updates itself whenever Fabrick adds new ones.
<fbk-checkout>
Presents every available payment method in a single interface and handles method selection for you. New methods added by Fabrick appear automatically, with no changes to your code.
<fbk-checkout
  payment-id="PAYMENT_ID"
  payment-token="PAYMENT_TOKEN"
  layout="horizontal"
  apple-button-style="black"
  apple-button-type="pay"
  google-button-style="black"
  google-button-type="pay">
</fbk-checkout>
| Attribute | Values | Default | Description |
|---|---|---|---|
layout | horizontal, vertical | horizontal | Graphical structure of the card form |
apple-button-style | black, white, white-outline | black | Apple Pay button appearance |
apple-button-type | plain, buy, pay | plain | Apple Pay button label |
google-button-style | black, white | black | Google Pay button appearance |
google-button-type | plain, buy, pay | plain | Google Pay button label |
<fbk-card>
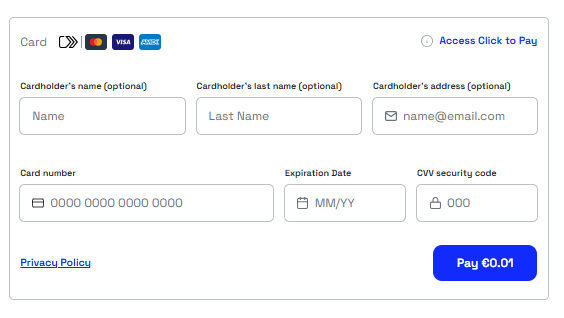
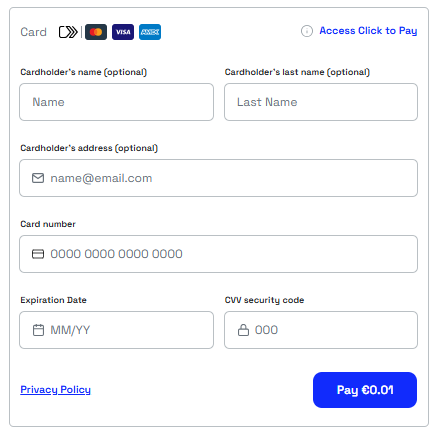
Collects card details for credit and debit card payments. Use it when you want to show card payments only, without wallets.
<fbk-card
  payment-id="PAYMENT_ID"
  payment-token="PAYMENT_TOKEN"
  layout="horizontal">
</fbk-card>
| Attribute | Values | Default | Description |
|---|---|---|---|
layout | horizontal, vertical | horizontal | Graphical structure of the card form |
layout="horizontal"
layout="vertical"
<fbk-apple-pay>
Renders a standalone Apple Pay button. The button appears in Safari on supported iOS, iPadOS, and macOS devices, and its label adapts automatically to the browser language.
<fbk-apple-pay
  payment-id="PAYMENT_ID"
  payment-token="PAYMENT_TOKEN"
  button-style="black"
  button-type="pay">
</fbk-apple-pay>
| Attribute | Values | Default | Description |
|---|---|---|---|
button-style | black, white, white-outline | black | Button appearance |
button-type | plain, buy, pay | plain | Button label |
button-style="black"

button-style="white"

Example with Italian localization:

Requires Apple Pay domain certification.
<fbk-google-pay>
Renders a standalone Google Pay button.
<fbk-google-pay
  payment-id="PAYMENT_ID"
  payment-token="PAYMENT_TOKEN"
  button-style="black"
  button-type="pay">
</fbk-google-pay>
| Attribute | Values | Default | Description |
|---|---|---|---|
button-style | black, white | black | Button appearance |
button-type | plain, buy, pay | plain | Button label |
button-style="black"

button-style="white"

Requires Google Pay domain certification.
Domain certification
Apple Pay and Google Pay require domain verification before they can be activated in production. The process differs for each provider.
Apple Pay
Host the domain association file provided by Fabrick on your domain, at the exact path required by Apple.
1. Download the file:
https://web.fabrick.com/.well-known/apple-developer-merchantid-domain-association
2. Publish it at:
https://{your-domain}/.well-known/apple-developer-merchantid-domain-association
The file must be publicly reachable, without authentication and without redirects.
3. Notify your Fabrick contact of the domain to complete registration.
Google Pay
Google manages certification through your own account.
1. Access the Google Pay & Wallet Console and create a Merchant ID.
2. Register the domain and complete Google's verification. When prompted, select PSP: Axerve as the integration type.
3. Provide the Merchant ID to your Fabrick contact, who will associate it with your account.
For details, refer to the official Google Pay documentation.
Complete example
<!doctype html>
<html lang="it">
<head>
  <meta charset="utf-8">
  <meta name="viewport" content="width=device-width, initial-scale=1">
  <script src="https://sandbox-web.axerve.com/orchestra/checkout/assets/elements/fbk-elements.js"></script>
</head>
<body>
  <fbk-checkout
    shop-login="GESPAY12345"
    payment-id="12345678910"
    payment-token="1234ea321-aaaa-bbbb-cccc-752ca0b8cb5b">
  </fbk-checkout>
</body>
</html>
Go-live checklist
Verify these points before activating the integration in production.
Script and configuration
- The script points to the production URL, not sandbox.
- The shopLogin is set before the component is mounted in the DOM.
- Your result page calls
GET /payment/detailwithpaymentIDandpaymentTokenand handles all transaction states, including declined payments and expired sessions.
Security
paymentIDandpaymentTokenare generated server-side and not exposed in client code.
Wallets
- The domain is certified for Apple Pay and the
.well-knownfile is publicly reachable. - The Google Merchant ID has been provided to your Fabrick contact and associated with the account.